Thunderbird to Outlook Converter software comes with a lot of smart defaults. Most settings are pre-configured to work well for typical email migrations. But even though the tool does a lot of the heavy lifting, it’s still important to understand what each option does and how it affects your results.
Getting the Most Out of Your Thunderbird to Outlook Conversion
Whether you’re moving a few personal messages or handling a full archive of professional correspondence, knowing how the settings work can help you avoid errors, stay organized, and make sure your emails end up exactly where you want them.
That’s why we put together this guide. Below, you’ll find clear explanations of each option, what they’re for, and how to use them—so you can feel confident about every step of the conversion.
Check That Email Client Is Running
The “Check That Email Client Is Running” setting is designed to prevent conversion errors caused by locked mailbox files. When Thunderbird is actively running and a folder, such as the Inbox, is selected, the corresponding mailbox file becomes locked by the application. This lock restricts access to the file, making it unreadable by external tools, including conversion software.
By enabling this option, our Thunderbird converter checks whether Thunderbird is currently open and accessing any mailbox files. If it detects that Thunderbird is running, it can either pause the process or prompt the user to close the email client, thereby avoiding file access conflicts and potential conversion failures.
Why It Matters
Locked mailbox files are one of the most common reasons for conversion errors. Without this safeguard, users may encounter messages like: “Error: Unable to read mailbox file. Conversion halted.”
This can be especially frustrating during large-scale migrations or when working under tight deadlines. The “Check That Email Client Is Running” option acts as a proactive measure, ensuring that the source files are available and accessible before the conversion begins.
Example
Imagine you’re migrating emails from Thunderbird to Outlook for a team of remote workers. One team member forgets to close Thunderbird before the conversion starts. The converter attempts to access their Inbox file, but it’s locked, causing the entire process to fail.
With this option enabled, the Thunderbird converter detects the issue early, alerts the user, and allows them to close Thunderbird before proceeding. This not only saves time but also prevents data loss and frustration.
Best Practices
To make the most of this feature:
-
- Always close Thunderbird before starting the conversion.
- Enable the “Check That Email Client Is Running” option in your converter settings.
- Run the conversion as an administrator to ensure full access to mailbox files.
- Inform team members about the importance of closing Thunderbird during migration.
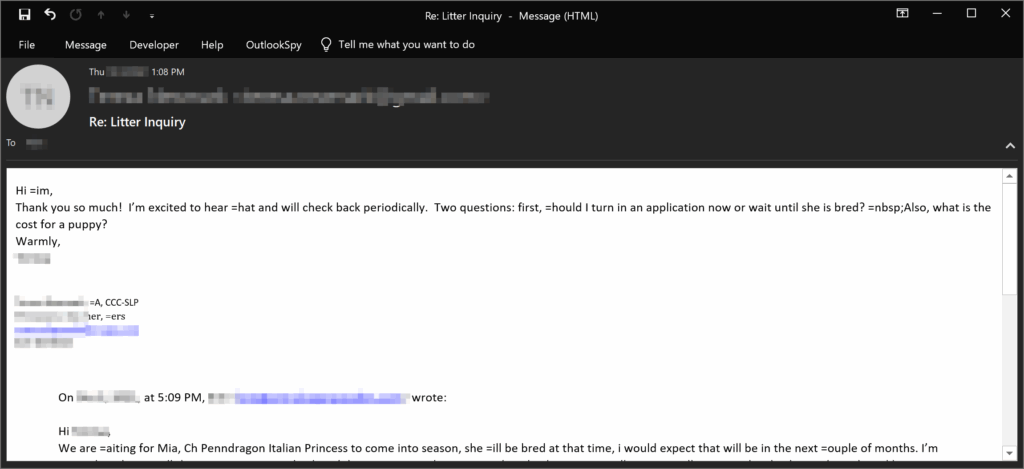
Correct Email Encoding (Mac/Unix to Win)
When transitioning from Thunderbird to Outlook, one often-overlooked challenge is email encoding compatibility across operating systems. Thunderbird stores emails in plain text format, and the way that text is encoded, especially line breaks and special characters, can vary depending on whether the emails were created on macOS, Linux, or Windows.
“Correct Email Encoding (Mac/Unix to Win)” option is enabled by default, this feature ensures that your messages are accurately interpreted and displayed in Outlook, regardless of the operating system they originated from.
Why Encoding Matters
Different operating systems use different standards for formatting text.
For example:
-
- macOS and Unix/Linux use LF (Line Feed) for line breaks.
- Windows uses CRLF (Carriage Return + Line Feed).
When these differences aren’t accounted for, converted emails may contain strange artifacts like =A=0, misplaced line breaks, or unreadable symbols, making your messages look corrupted or confusing.
What This Option Does
With this option enabled, the converter automatically adjusts the encoding of each email during extraction. It scans the original message structure and replaces incompatible formatting with Windows-friendly equivalents. This ensures that:
-
- Line breaks appear correctly in Outlook.
- Special characters are preserved and readable.
- Messages maintain their original layout and clarity.
Example in Action
Let’s say you’ve been using Thunderbird on a MacBook for years and now need to migrate to Outlook on a Windows desktop. Without this encoding correction, your emails might show up with broken formatting, making it hard to read or respond to them.
By keeping this option enabled, the converter seamlessly translates the encoding, so your emails look exactly as they should in Outlook i.e. clean, professional, and intact.
Best Practices
-
- Leave this option enabled, it’s turned on by default for a reason.
- Preview converted emails to ensure formatting is preserved.
- Use converters that support cross-platform encoding correction for best results.
Choosing the Right Outlook Profile During Conversion
If you use Outlook with more than one profile, for example, one for work and another for personal emails, this option helps you decide where your converted Thunderbird emails should go.
When you run the converter, it needs to use Outlook to create or import the emails. Outlook organizes everything under profiles, and each profile can have its own email accounts, folders, and settings. So, if you’re importing emails, you’ll want to make sure they end up in the right place.
With this option turned on (which it usually is by default), our Thunderbird converter will ask you to pick which Outlook profile to use.
That way, you can:
-
- Keep your personal and work emails separate.
- Import old emails into a new profile without mixing them with your current inbox.
- Create a temporary profile just for the conversion, so you can sort things out later.
Example
Let’s say you’re moving emails from Thunderbird that you used for a freelance project. You don’t want those emails mixed into your main work account. You can create a new Outlook profile called “Freelance Archive,” and when the converter asks, you select that one. Now everything stays organized.
Tip: If you’re not sure which profile to use, or you’ve never created one before, you can open Outlook’s profile manager and set one up. It’s a good way to keep things tidy, especially if you’re dealing with lots of different email sources.
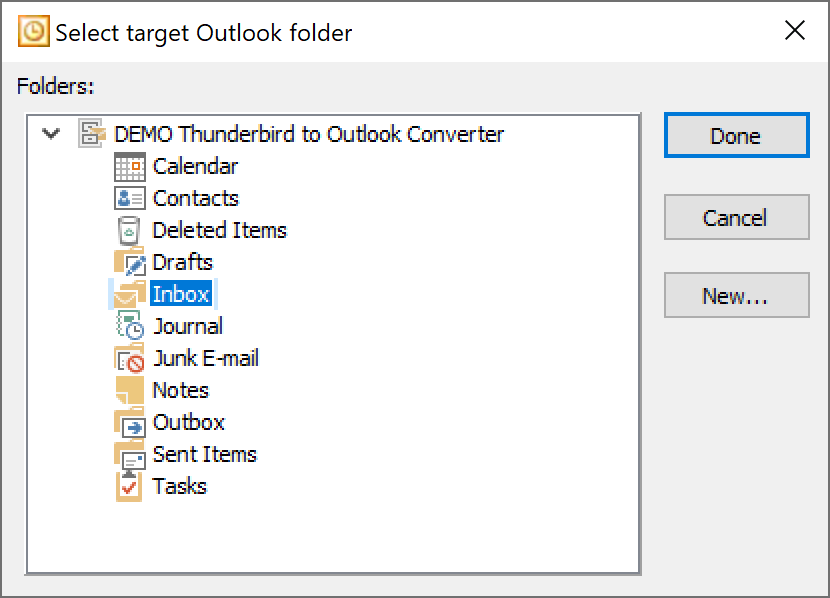
Choosing Where Your Emails Go in Outlook
When you’re converting emails from Thunderbird to Outlook, it’s not just about getting the messages across, it’s also about deciding where they should land once they’re in Outlook. That’s what the Target Outlook Folder option is for.
Outlook uses a PST file to store emails, and inside that file are standard folders like Inbox, Sent Items, Drafts, and more. During conversion, you can choose exactly which folder your imported emails should go into. This helps you stay organized and avoid mixing new emails with old ones.
Here are the three choices you’ll usually see:
-
- Prompt to Select the Outlook Folder (default)
- Top of Outlook Folders
- Inbox
Prompt to Select the Outlook Folder
This is the most flexible option. When you start the conversion, the software will show you Outlook’s folder selection window. You can pick an existing folder or create a new one, like “Thunderbird Archive” or “Old Emails”, to keep things separate.
Example: You’re importing emails from a personal Thunderbird account but don’t want them mixed into your work Inbox. Just create a folder called “Personal Import” and select it during conversion.
Top of Outlook Folders
This puts the imported emails at the root level of your Outlook data file, not inside any specific folder. It’s useful if you want to manually organize them later or if you’re importing a large batch and prefer to sort afterward.
Example: You’re importing thousands of archived messages and want to review them before filing them into folders. This option gives you a clean slate.
Inbox
This sends all converted emails directly into your Outlook Inbox. It’s quick and simple, but it can clutter your current inbox if you’re not careful.
Example: You’re importing recent Thunderbird messages and want to continue working with them right away in Outlook. This option drops them right where you’ll see them first.
Tips for Staying Organized
- If you’re importing emails from different sources, create a folder for each one.
- Use clear folder names like “Client A,” “Old Thunderbird,” or “2024 Archive.”
- Stick with the default prompt if you’re unsure—it gives you full control.
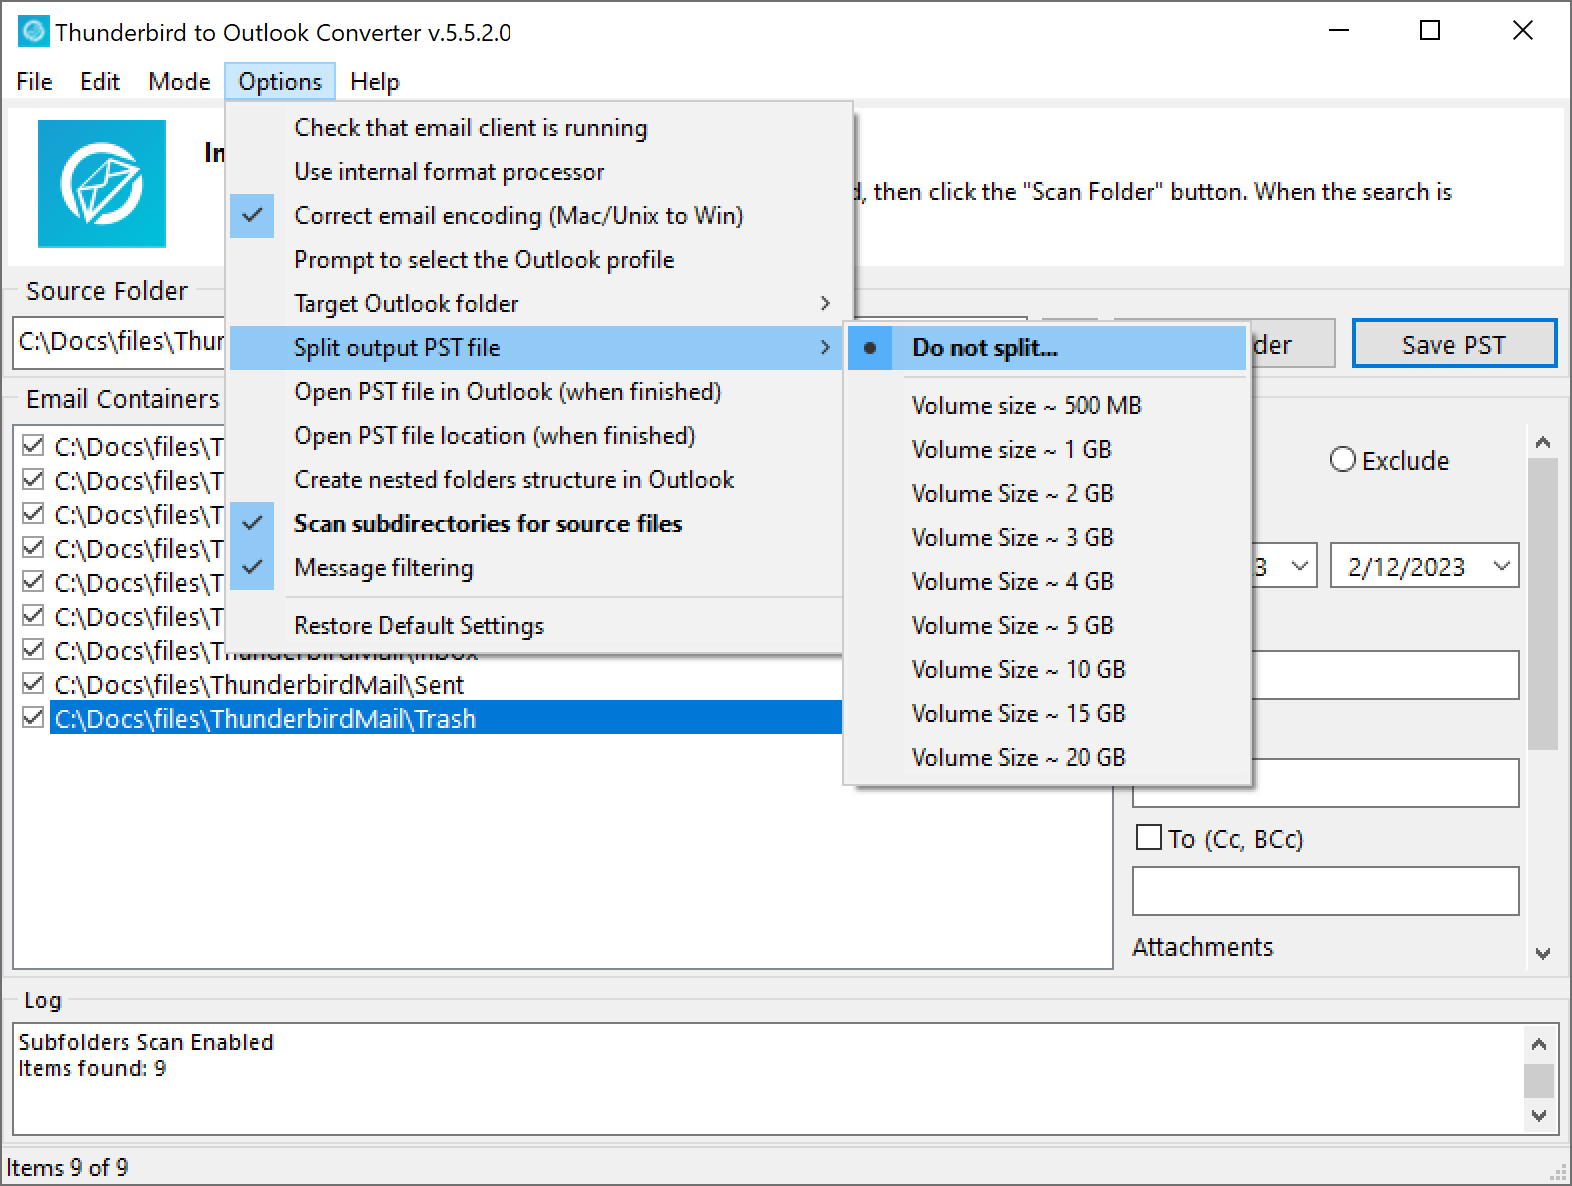
Splitting the Output PST File During Conversion
When you’re converting emails from Thunderbird to Outlook, the result is usually a PST file, a format Outlook uses to store emails, contacts, and other data. But here’s the thing: PST files have size limits, and if you go over those limits, Outlook can slow down or even stop working properly.
That’s why most converters include a Split Output PST File option. It lets you break the converted data into smaller chunks so Outlook can handle it more easily.
Why Size Matters
Different versions of Outlook have different limits:
-
- Outlook 2002 and earlier: Max PST size is 2 GB.
- Outlook 2003–2010: Default limit is 20 GB, but it can be increased.
- Outlook 2013 and newer: Default limit is 50 GB, and advanced users can raise it even more using the Windows Registry.
If you’re not sure which version you’re using, or you just want to play it safe, splitting the PST file is a smart move.
Sub-Options You Can Choose
Here’s what you’ll typically see:
-
- Do Not Split (default): All emails go into one big PST file. Good for small conversions.
- Volume Size 500 MB … 20 GB: Breaks the data into smaller files, ideal for older Outlook versions or limited storage. These options give you more control depending on how much data you’re converting and what your Outlook version can handle.
Keep in mind: the actual file sizes may vary a bit, since emails aren’t all the same size. Attachments, formatting, and metadata can affect the final output.
Example
Let’s say you’re converting 30 GB of Thunderbird emails and you’re using Outlook 2010. If you choose the 10 GB split, the converter will create three PST files—each around 10 GB—so Outlook can manage them without hitting its limit.
Tips
- If you’re converting a large archive, splitting is usually a good idea.
- Use smaller volumes if you’re planning to move PST files between devices or store them on external drives.
- Advanced users can tweak Outlook’s size limits in the Registry, but for most people, using the split option is easier and safer.
What Happens After Conversion: Opening the PST File and Its Location
Once you’ve finished converting your Thunderbird emails to Outlook using a converter tool, the next step is usually to check the results. That’s where these two helpful options come in:
Option 1: Open PST File in Outlook (when finished)
This option tells the Thunderbird converter to automatically open the PST file in Outlook once the conversion is done. If everything goes smoothly, you may launch Outlook (or switch focus if it’s already running), and the newly created or updated PST file will be loaded. You can then browse through your imported emails right away.
But sometimes Outlook might be busy, or there could be a system hiccup that prevents the file from opening automatically. In that case, the converter will show a message in its log window explaining what happened and what you can do next.
If the PST doesn’t open automatically, here’s how to do it manually:
-
- Open Outlook.
- Go to File > Open & Export > Open Outlook Data File.
- Find the PST file you just created.
- Click Open—your emails will appear in Outlook.
Option 2: Open PST File Location (when finished)
This option is more about convenience. After the conversion, it opens Windows File Explorer and highlights the PST file you just created. That way, you don’t have to dig through folders to find it, it’s right there, ready to be opened or moved.
This is especially useful if:
-
- You want to back up the PST file.
- You’re planning to copy it to another computer.
- You need to attach it to an email or upload it somewhere.
Why These Options Matter
These two settings make it easier to wrap up the conversion process without extra steps. Whether you want to jump straight into Outlook or just locate the file for later use, they save time and reduce confusion.
Keeping Your Folder Structure: Create Nested Folders in Outlook
When you’re moving emails from Thunderbird to Outlook, you might have a bunch of folders and subfolders, like “Work,” “Work/2024,” “Personal,” “Personal/Travel,” and so on. If you’ve spent time organizing your emails, it makes sense to keep that structure during the conversion.
That’s what the Create Nested Folders Structure in Outlook option is for.
What It Does
If “Create Nested Folders in Outlook” option is enabled, the Thunderbird converter reads your folder layout in Thunderbird and recreates it in Outlook. So if you had a folder called “Projects” with subfolders like “Client A” and “Client B,” Outlook will show the same structure after the conversion.
If this option is disabled, all emails will be imported into a single folder, the one you choose during setup. Subfolders won’t be created, and everything will be grouped together.
Example
Let’s say your Thunderbird setup looks like this:
Inbox
├── Work
│ ├── Reports
│ └── Meetings
├── Personal
│ ├── Travel
│ └── Family
With nested folders enabled, Outlook will mirror this structure. Without it, all those emails will land in one folder, making it harder to find specific messages later.
When to Use It
-
- Enable it if you want to keep your folder organization intact.
- Disable it if you prefer to sort everything manually after the conversion or if your folder structure is messy and you want a fresh start.
Scanning Subfolders for Mailboxes
When you’re converting emails from Thunderbird to Outlook, your mailboxes might be spread across multiple folders and subfolders, especially if you’ve been using Thunderbird for a long time or have organized your emails by project, year, or account.
The Scan Subdirectories for Source Files option helps the converter find all those mailboxes, no matter how deeply they’re nested.
What This Option Does
By default, this option is turned on. That means the converter will look not just in the folder you select, but also in all of its subfolders. It will search through the entire folder tree and find every mailbox file it can, so nothing gets missed.
If you turn this option off, the converter will only check the folder you selected. It won’t look inside any subfolders, and any mailboxes stored there will be ignored.
Example
Let’s say your Thunderbird mail is stored like this:
Thunderbird Mail
├── Personal
│ └── Travel
├── Work
│ ├── Clients
│ └── Reports
With this option enabled, the converter will find mailbox files in Personal, Travel, Work, Clients, and Reports. If you disable it, it will only check the top-level Thunderbird Mail folder and skip everything else.
When to Use It
- Leave it on if you want to make sure all your emails are found and converted, including those in subfolders.
- Turn it off if you only want to convert mailboxes from a specific folder and ignore everything else.
Filtering Emails Before Conversion
If you don’t want to convert every single email from Thunderbird to Outlook, the Message Filtering option gives you control over what gets included, and what doesn’t. It’s a flexible tool that lets you set up filters based on things like dates, senders, subjects, attachments, and more.
This is especially useful if you’re dealing with a large mailbox and only need specific emails, or if you want to skip spam, old messages, or irrelevant content.
How It Works
When you enable message filtering, the converter shows a panel with different fields and checkboxes. You can choose to Include or Exclude emails based on your criteria.
Here’s what you can filter by:
📅 Date Range
-
- Enable the Period checkbox and choose a start and end date.
- If you select Include, only emails within that date range will be converted.
- If you select Exclude, emails from that range will be skipped.
📝 Subject
-
- Enable the Subject checkbox and enter a keyword or phrase.
- For example, if you type “Spam” and choose Exclude, any email with “Spam” in the subject will be ignored.
👤 From / To / Cc / Bcc
-
- These fields work the same way: enable the checkbox and enter an email address or name.
- You can filter emails from specific people or those sent to certain recipients.
📎 Attachments
Choose between:
-
- Contain one or more: Only emails with attachments.
- Without attachments: Only emails without attachments.
❗ Importance
-
- Filter by how the email was marked: Any, Low, Normal, or High.
👁️ State
-
- Choose whether to include: Any, Read, or Unread emails.
Example
Let’s say you only want to convert unread emails from the last six months that were sent to your work address and contain attachments. You’d set:
-
- Include + enable Period with the last six months.
- Enable To and enter your work email.
- Set Attachments to “Contain one or more.”
- Set State to “Unread.”
Only those emails will be converted, everything else will be skipped.
Why It’s Useful
-
- Saves time and disk space by skipping emails you don’t need.
- Helps avoid clutter in Outlook.
- Makes it easier to focus on relevant messages during migration.
Using the Internal Format Processor (Optional)
Most of the time, when you convert emails from Thunderbird to Outlook, the software relies on Outlook’s built-in tools, specifically something called the MAPI library, to handle the conversion. It’s fast and works well for most users.
But there’s also an alternative: the Internal Format Processor. This is a feature built into the converter itself. Instead of using Outlook’s older conversion methods, it uses its own algorithms to read and convert Thunderbird emails into PST format.
Why Use It?
Outlook’s built-in conversion tools haven’t changed much over the years. They’re reliable, but in some rare cases, they might miss certain details or struggle with unusual email formats.
The internal processor is designed to be more accurate. It might take a bit longer to run, but it can handle tricky emails better, especially if you’ve got messages with complex formatting, non-standard attachments, or encoding issues.
When to Try It
- If you notice formatting problems or missing content after using the default method.
- If Outlook crashes or fails to open the converted PST file.
- If you’re working with older or heavily customized Thunderbird mailboxes.
It’s not something most people need to use, but it’s good to know it’s there, just in case.
Final Thoughts
Switching from Mozilla Thunderbird to Microsoft Outlook can make managing your emails more efficient and better integrated with other tools you use. The Thunderbird to Outlook Converter helps simplify that process by turning your Thunderbird mailbox files into Outlook-compatible PST files.
Most of the converter’s settings are ready to use right away, but taking a few minutes to understand what each option does can help you avoid errors, stay organized, and make sure your emails end up exactly where you want them.
If anything in this article was unclear, or if you have questions about how the software works or which options to use, feel free to reach out to us. We’re here to help make your email migration as smooth as possible.


4 Comments
The following error message appeared during my conversion: “Outlook PST file size limit has been reached.”
This is a bit strange, since my pst file was smaller than 2 GB, and the maximum size of pst files for Outlook is 50 GB.
How can I fix this problem?
You’ve encountered a rare issue that typically (but not always) arises when users upgrade from an older version of Outlook to a modern one. During the upgrade process, some system libraries or registry settings may not update correctly. As a result, Outlook continues to create PST files in the outdated ANSI format, which has a strict size limit of 2 GB – far below the 50 GB supported by the newer Unicode format.
Workaround:
Download our clean, empty Unicode PST file (download link was emailed to you) and use it as your target destination. Simply import your emails into this file to bypass the limitation.
Other options:
– Reinstall Outlook to ensure all components and registry values are properly updated.
– Try running our software on a different PC where Outlook is correctly configured to create Unicode PST files.
You’re absolutely right to be puzzled, modern versions of Outlook support PST files up to 50 GB, so hitting a limit at 2 GB suggests something else is going on. Here’s what might be causing the issue and how to fix it:
1. Legacy Format (ANSI PST). If your PST file was created in Outlook 2002 or earlier, it uses the ANSI format, which has a hard limit of 2 GB. Even if you’re using a newer Outlook version now, importing into an old-format PST will trigger this error.
2. Registry Settings Limiting Size. Outlook allows administrators to set custom size limits via the Windows Registry. If these are configured to cap PST files at 2 GB or another low threshold, you’ll hit that wall even if the file format supports more.
3. Corruption or Misreporting. Sometimes the PST file may be corrupted or misreport its size, especially during bulk imports. Outlook might then refuse to write more data.
Step1: Open Outlook. Right-click the PST file in the navigation pane → Data File Properties → Advanced. If it says “Outlook Data File (97-2002)”, it’s ANSI. You’ll need to create a new Unicode PST: File → Account Settings → Data Files → Add → Create new PST. Make sure it’s Unicode format (default in Outlook 2003+).
Step 2: Check Registry Limits. If you’re comfortable editing the registry:
Navigate to: HKEY_CURRENT_USER\Software\Microsoft\Office\\Outlook\PST
Look for these entries:
MaxFileSize (hard limit)
WarnFileSize (warning threshold)
If they exist and are set to ~2 GB (2,097,152 KB), increase them:
MaxFileSize → 50 GB = 51,200,000 KB
WarnFileSize → ~48 GB = 49,152,000 KB
You can find detailed instructions on Microsoft’s official guide.
Step 3: Split or Compact the PST
Use Outlook’s Archive feature to move older emails to a separate PST.
Or use the Compact Now option: File → Account Settings → Data Files → Settings → Advanced → Compact Now.
If you’re using conversion software, make sure it’s creating Unicode PSTs and not defaulting to ANSI. Some tools have settings for this buried in their advanced options.
Just wanted to say thanks for the great tool. I’ve completed the conversion from Thunderbird to Outlook and everything went smoothly. Even large attachments like RAW files and client documents came through perfectly, and my folder structure was preserved just the way I had it. Really impressed, this saved me a ton of time!